Tuesday, April 26, 2011

Jose Rizal today


This is a glimpse of my work for an upcoming group show for the annual Looking for Juan Outdoor Banner Project in June. I am so excited about this work and for the show. This year the theme focuses on the relevance of our national hero, Jose Rizal, today.

If Rizal were alive today, I wonder what he thinks about the RH bill, facebook, and the issues on child abuse today.

Monday, April 25, 2011

sell out


I unexpectedly met a good old friend and his candid question had me pondering.

"Are books still selling?"

Good thing a passerby interrupted our conversation before I could say something. I'm about to defend my work as a children's book illustrator despite its meager means. But his question instead led me face another personal question I asked myself, "Do I always aim for the money?"

I know that the idea that sometimes money isn't the best motivator is already a cliche. I think that our passion towards the things we love doing best never asks for any material worth in the world.


Tuesday, April 19, 2011

lenten visual reflections


I hope these images help you reflect this lenten season.


How to make a classic story look postmodern


work in progress for an upcoming book

pig as personification for conquerors, oppressors, irresponsible capitalists


Most of the time, readers are accustomed to seeing pictures that literally correspond to the text or words. If the picture is inconsistent with the words, typically it shakes up their flow of reading and make them look again or perhaps form inquiries about why such mismatches. That is how postmodern picture books work. Some authors or illustrators use this technique to offer and challenge the readers their own interpretation.

So how do you make a modern classic story postmodern (how oxymoronic!)? Make figurative interpretations.


How to make 3D Stereogram or "Magic Eye" in Photoshop


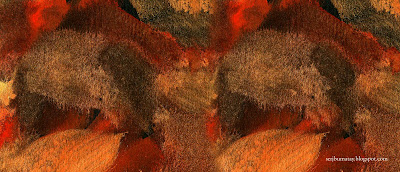
Can you find the 3D object in the image above? Can you guess what it is? My tutorial on how to make a 3D stereo pair in photoshop post is the most popular, so I'm doing an update. I'm not sure if some got it right, you can leave a comment if you need clarity. I'll be glad helping you create your 3D. :-)

This time I'm posting a stereogram using texture. I'm assuming you already have a bit knowledge of photoshop because this tutorial will focus more on creating a stereogram.
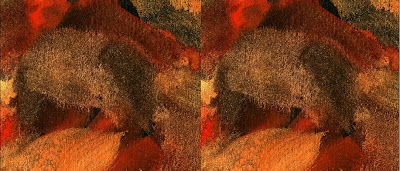


The magic of stereograms lie in making a pair of image and blending the seams together
creating an illusion of a complete image

First, select an image with lots of random patterns in it. A good image is a texture but you may also find some patterns like the usual magic eye patterns. Or, you may also create your own using some filters in photoshop like clouds etc. The thing is, you should get an image that should seamlessly blend together when you duplicate the image and still look as a whole image.

The photo above shows my chosen texture duplicated in another layer in photoshop. Place them together side by side then blur the middle part by erasing or smudging to make it look like a complete picture. You can do your own retouching techniques, the idea is to create the illusion of a complete image from two image pair. If you decide to use patterns, copy a row strip of that pattern and place it in the middle to hide the seams.
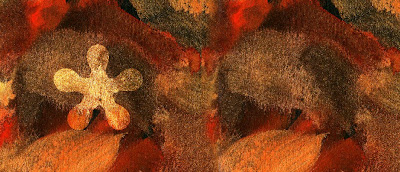


Now, using the custom shape tool or the pen tool, draw the image or object (can be letters, scene, or shape) that you want to "float" in 3D. I used the shape in the photo above (now you know what to find in the first topmost photo). I also lightened the floating invisible object just to show you how and where the object looks like. Cut this object from the first image of the pair (or the textured background) using the selection tool and create another layer for this floating object on top of all the layers. You now have 3 layers: the first image (left), the second image (right), and the floating object. Leave the object/layer in place so it looks invisible within the textured background.
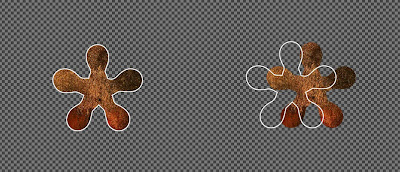


Duplicate the floating object then move it to the right within the second (right) textured background image pair, slightly moving a bit (say a third part) in the same place where the original object is. The white outline in the photo above indicates where the first original object is.

This slight deviation of place creates the 3D effect when you try to look on the object using the cross-eye method.

You can estimate where to place the second object, slightly to the right of the original place if you want the object floating farther to the back or slightly to the left if you want the object float forward. Just make sure that the object still blends (or hides) within the textured background so that it looks invisible.
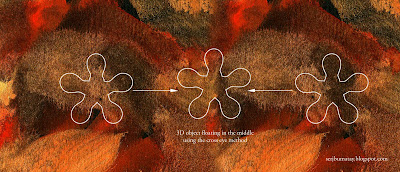


The photo above gives a clue on how you'd see the invisible 3D object using the cross-eye method. I traced the object with a white line just to show what's going on. The cross eye method is an alternative way of seeing the 3D image without any gadget. You can browse the web for more info. With this kind of 3D Stereogram, you can't see the 3D object using the red and blue glasses, I'll be posting another tutorial for that.

Here's another 3D magic eye I made using an illustration.

Enjoy creating your own 3D magic eye!


***

If you like this post, please comment

And please check out my youtube videos and sub my channel:


Magic eye inspired art:

scarf print here


pillow while viewing magic eyes


How to make an origami paper lantern

Tutorial after the jump.


Looking for pages to color? Time for quirky and wild coloring pages. Get them here!


This pattern is applicable for a whole vellum cartolina paper with the size 28.5" x 21.75". You may apply this to a short bond size paper since it is a scaled down size of the cartolina. There are many patterns on the web but I modified this version to easily measure and fold that will fit the cartolina.

First, fold the paper in half. You may measure it first or fold it by meeting both ends then carefully scouring to fold. From the first fold, fold it again to meet the ends in the middle. You should now have 3 folds or 4 panels. While they are all folded, fold it again but this time divide them into 3 panels to make each side 6 parts. So you will have 12 parts in the entire sheet.


You should now have 12 equal parts throughout. It's important to make the folded side consistent, fold them in one side only. You can reverse the fold if they are not on all the other side together. This will make gathering all the folds easier later.


Measure and divide the paper into 4 parts horizontally as shown in the photo above. Mark them with points or a light line across the folds. From this line, follow the diamond pattern in the photo by scouring first with a pointed tool and a ruler.


After scouring, fold them diagonally at a time to avoid misalignment. Flatten it lightly using a straightedge. By the way, fold them altogether on the reverse side of the 12 parts fold.


Carefully gather all the folds together like in the photo. It should easily gather up. After creating your masterpiece, make two more pieces and glue or tape them together. You may also add more pieces if you like. It is easier to make one piece first then join several pieces together than gluing a long piece of paper, it'll be harder to fold them after.

You may also vary the number of folds and the size of the diamond. The key is, the shape has to be a long narrow diamond so that you can fold, otherwise, the folds won't gather at all (I tried several shapes).

To gather the folds in place, punch small holes on every other panel and insert string. Secure the string by tying it together.


This is how the lantern should look like. You may hang this paper lantern as is along with several pieces, or place a lighting system inside. Just make sure to spray some fire retardant before hanging.

If you have questions or need help in clarifying some steps, I'll gladly answer your questions.